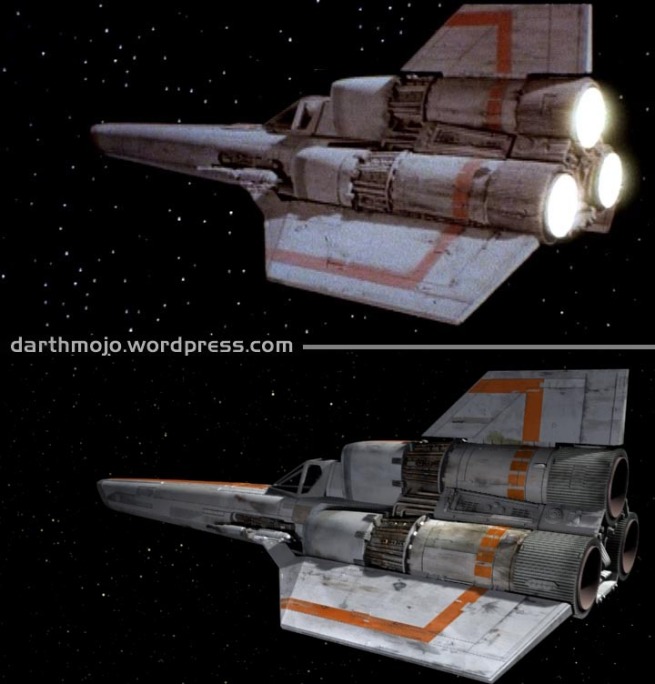
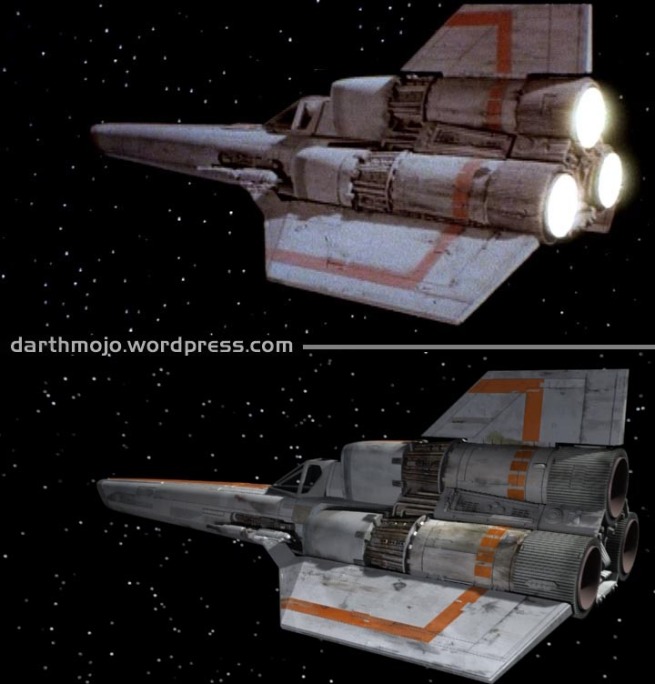
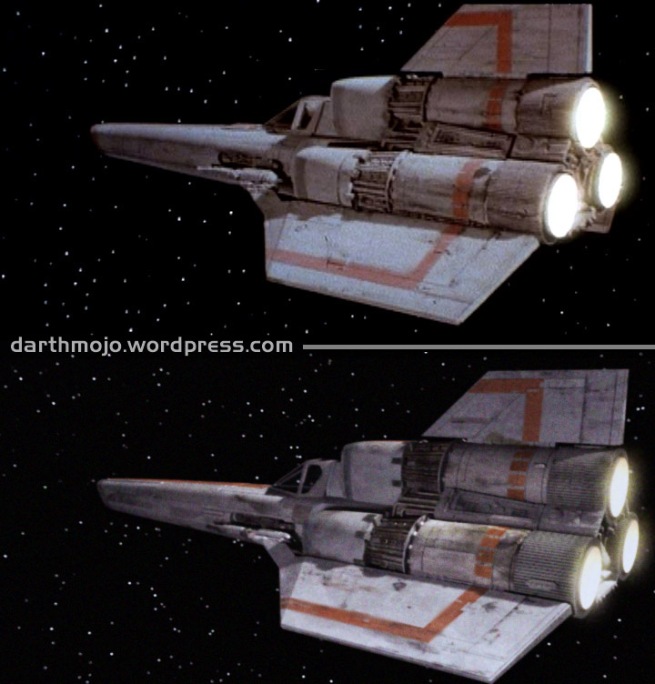
Over the weekend I posted the above image of a Viper from the 1979 version of Battlestar Galactica; as most people are aware, when that show was produced there was no such thing as CGI, so all of the visual effects were created “old school,” meaning the Vipers were actual, physical models, photographed with real lights and a real camera. Thirty years later, visual effects on the new BSG are created entirely with computers, but, despite all this fancy new technology, the goal of most artists is to still have it look like good old-fashioned miniatures and cameras! Of course, on the new series, there never was a real Viper model, so we have nothing to compare the CGI version with to see if we “got it right.” However, there is plenty of footage of physical Viper models in episodes from the original BSG, so I decided to see just how close I could make a “fake” Viper look like a “real” Viper…
Truth be told, this whole saga began not as an experiment to see if I could fool people into thinking a CGI Viper was real, but to evaluate the work of a very talented Galactica fan and 3D artist, Derek Smith. Derek (for reasons known only to him), had taken a blood-oath to make the most perfect CGI Viper model humanly possible. In the world of 3D fanboys, the Viper is one of the most common project ships out there; hunt around online and you’ll find dozens of 3D Viper models – some of them suck and some of them are OK, but none of them would ever be confused with “the real thing.”
Derek wanted to confuse the world!
DETAILS, DETAILS
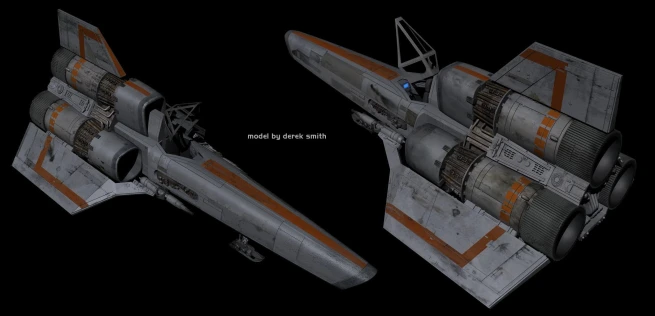
With steel-willed intent, our erstwhile modeler hunted down reference of the original filming miniature, as well as the ’70s model kits from which pieces were cannibalized to make it. Armed with a pair of calipers and a mouse, he painstakingly “translated” every last fuel line and cockpit rivet from the real world into his computer modeling software (Lightwave 3D from Newtek). Derek spent the better part of his free time for over two years putting this thing together, and it was a just few months ago that his friend and mentor, Lee Stringer (CG Supervisor of the new BSG during season one), asked me to take a look at it (click to enlarge):
To be honest, I was initially underwhelmed. I appreciated the fine level of detail and skill that went into building it, but my first thought was “it looks like a really good re-creation of a model kit, not a real Viper.” I didn’t even have the heart to email Derek and tell him, since I knew how much time and effort he put into the work that I was so readily dismissing. I figured I’d take another look at it when I had more time and see if my opinion changed.
It didn’t. I asked Mr. Stringer for guidance. “Lee, what do I tell this guy? He put so much work into this thing and I don’t want to tell him it sucks!” Lee thought for a moment and suggested, “maybe it just needs to be lit properly. Studio lighting is way different that the simple lighting Derek used to just show off the model.”
I was skeptical, but I wanted to give the guy with the blood oath the benefit of the doubt, so I fired up Lightwave and loaded the model.
DOWN AND DIRTY
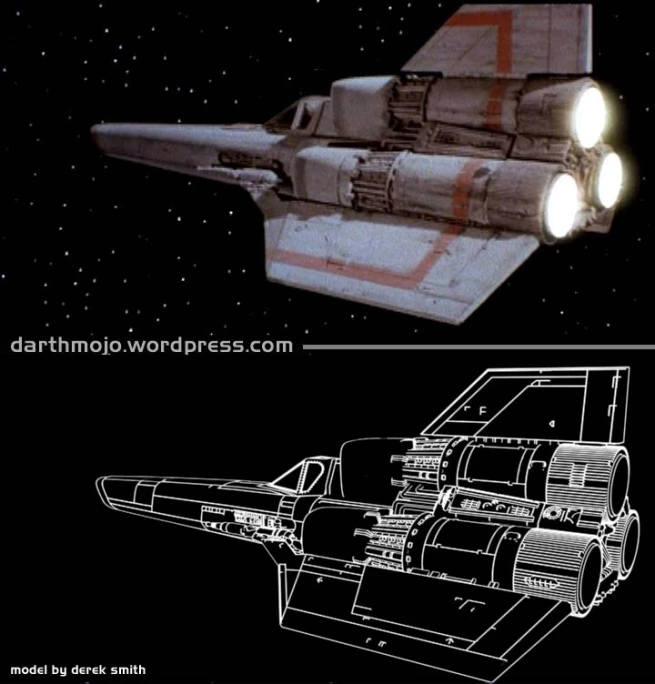
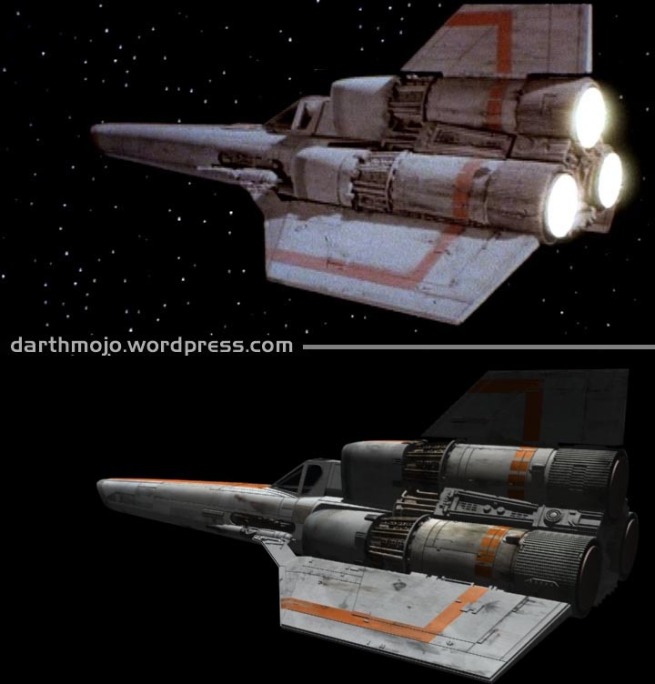
I figured if I was going to see how close it was of a match to the original Viper, I should take a framegrab of one from a DVD – the way we all remember it – and see if I could match the look using Derek’s model and some studio-style lighting (and since I often tell people that lighting is everything, it was time to put my money where my mouth was). So, the first step was to pick a nice shot from the show and position the CG Viper in roughly the same way:
Here is the CG Viper, roughly positioned the same way as the real Viper. No, it’s not a perfect match, but remember – this wasn’t an exercise to perfectly duplicate the original image, just an attempt to see if the CG Viper could at least “hold a candle” to the real miniature. Now let’s get some light on it!
Here it is with the default Lightwave light, called a “distant” light. It has perfectly parallel rays, designed to mimic sunlight. Exactly what you’d want on a spaceship, since it’s flying out in space and lit by the sun! But in this case we’re trying to match the look of a filming miniature, which was lit by a spotlight in a studio and not the sun. So, with a click of the mouse I turned the light into a spotlight and examined the image to find clues as to where the light might have been placed by the guy with long hair and Bee-Gees T-shirt (remember, this was the late 70s)!
The circled areas show the best cues on the model that give away light placement, which was roughly from above and slightly behind the ship. I had the framegrab opened in one window while I positioned the light in Lightwave (using the indispensible preview tool “F-Prime,” I was able to track the movement of the shadow in real time I positioned the light). Once I got it “close enough” I locked the light in place. Now, take a close look at the shadow on the wing, where it meets the engine – see how the complex shape of the shadow is nearly a perfect match for the same shadow on the filming miniature? Now that’s modeling accuracy! I was becoming more and more impressed with Derek’s model. Now that the key light was set, it was time to look at fill.
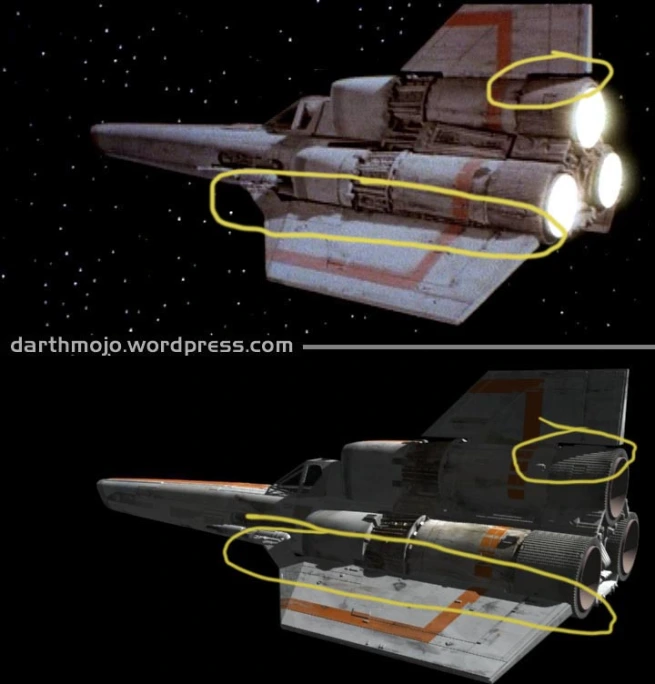
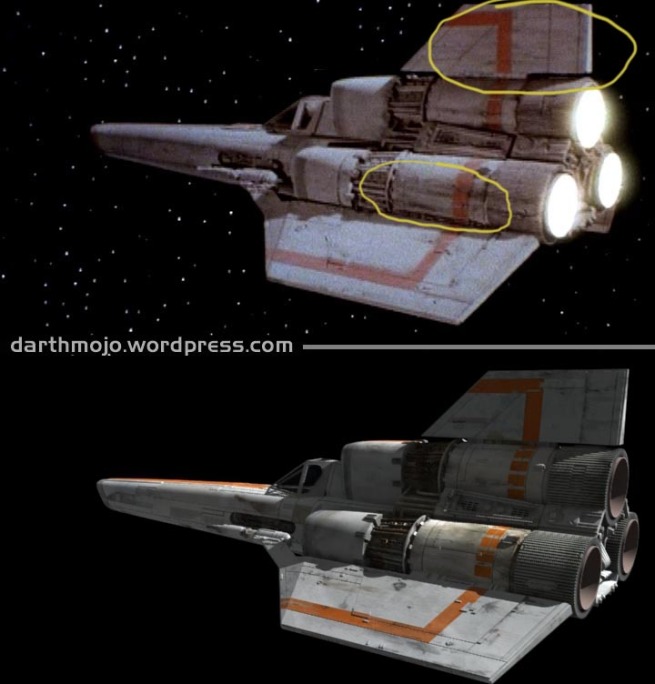
A few posts back I did a piece about backdrop radiosity, and how it casts a nice, even, studio-like fill light on 3D objects. Since the original BSG used far more fill than the new series, I wanted these areas of the ship to look as good as possible, so I started out by using backdrop radiosity at about 50%. It nicely filled in the areas that the spotlight wasn’t catching, and the wonderful dimensionality you get from radiosity started to make the render look really good. I was just about ready to call it a day and tell Derek his model passed muster, but something about the fill light from the original framegrab caught by eye and told me it wasn’t right. See the yellow circles on the 1979 image? I was catching a hint of speculaity (i.e. shine) on these parts of the ship – something that could only come fr0m another true lightsource . Now the game was afoot!
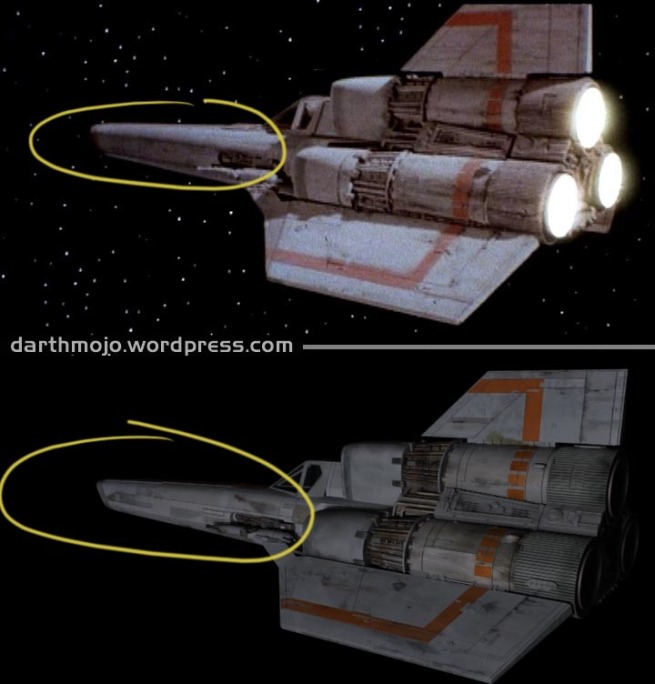
At this point I decided to go all the way and see if I could reverse engineer and re-create all the natural elements of the 1979 studio. Obviously backdrop radiosity was not in anyone’s toolbelt back then, so I ditched it and added another light to use as my fill source. In most cases, a soft light is used for fill, so I added an “area light” in Lightwave, which does a good job at mimicking soft shadows. Using the subtle spec highlights as my guide, I moved the light around until I was able to catch those same highlights on the CG model. Success! But wait, something still seemed amiss… if you look at the circles here, you can see how the nose goes a bit dark in the real-world image. Why?
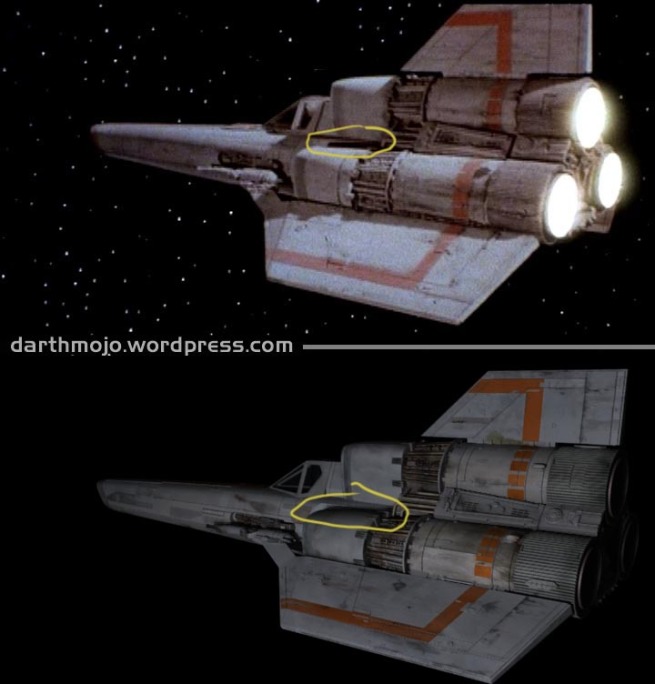
Because the light from real light bulbs diminish as it gets further from the source! Naturally, the part of the model closest to the light will be brightest, so I added a falloff to the CG fill (in the world of computers, lights are perfect – meaning even illumination all the way to infinity – unless you tell it otherwise). Ah, that’s more like it! Just that one little change made the model look much more like it was in a studio. After I finished setting the fill, I noticed that little extra shadow you see circled here – my confirmation that the light was properly placed. This whole process made me feel like part of the CSI team, using little bits and pieces of forensic evidence to recreate the scene of the crime…
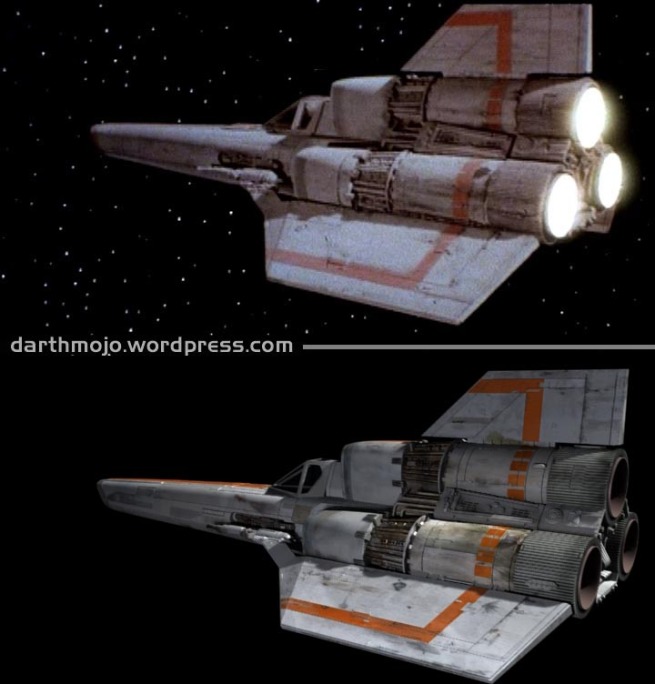
Combine the key and fill and viola! We now have a very close CGI match for the original 1979 studio lighting. After I spent a few minutes patting myself on the back, I decided to take things a little further and see what it would take to actually duplicate the look of the entire picture!
First up was the starfield. I started out with a very natural backdrop, similar to the starfield you see on the current Battlestar Galactica. No matter how nice it may look, clearly it’s not even close to the 1979 stars, which were far brighter and larger. So, a few tweaks to Lightwave’s starfield object and particle size later…
That’s more like it! Not a perfect match, but the look and feel is right (mine has a little bit more contrast and variation). Back in 1979, they had to play it safe and overdo it with the stars – between the multiple generations of film they had to go through for the optical printing and the unpredictability of analog TV transmission, if the starfield was too subtle it might have disappeared completely! One last detail to add before we go into post-post production…
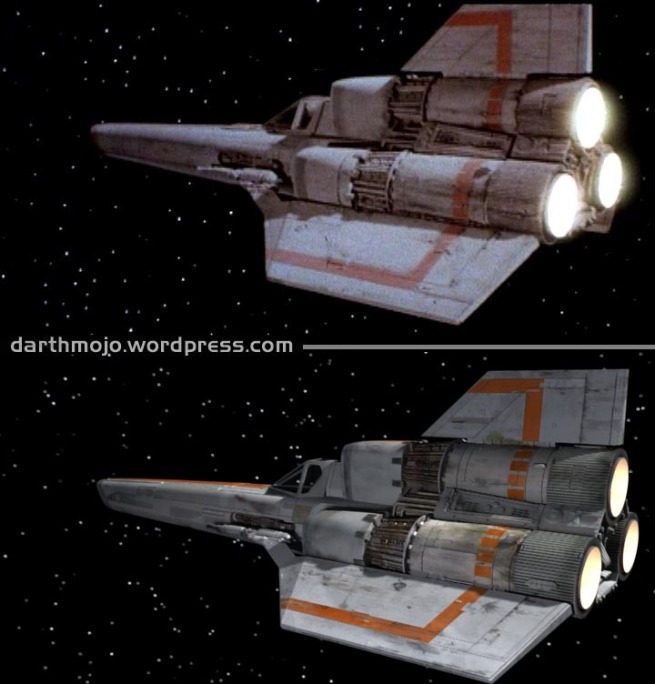
By sticking a few lights into the engine nozzles, we simulate the light from the thrusters. Now we’ve got all our bases covered! Even so, it doesn’t take a degree in computer animation to see that our painstakingly re-created Viper still doesn’t match the original. No matter how you slice it, a shiny new CG render is a far cry from an image that was not only created on film, but was spat out as a result of multiple generations, various color timings and, ultimately, DVD compression. The solution? Take our shiny new CG render and drag it through some digital mud.
Ah, that’s more like it! By adding some fake film grain, compression artifacts, a little blur and tint adjustment, we’ve now teleported our ultra-modern 2009 CGI Viper into the distant past, where it can now go out and play with its 1979 cousins and not get beat up for looking like a freak.
Ultimately, this is a textbook example of how making CGI look real is all about fighting perfection. Everything you do in CG is automatically perfect – every box you make, every paint job you give it, every light you set – is flawless. It may be oversimplifying things, but in a nutshell, our job is to constantly identify new ways to degrade that natural beauty: make the line a little jagged, fray the edges of the cloth, scratch up the window, put some smudges on the flashlight or take down that red nose from 255/0/0 to 235/15/20.
It almost always comes down to chiseling away that last little bit of perfection to create a truly perfect image!
Next week we’ll figure out how to pick up girls.
–
–
–

Great walkthrough of all the various steps involved in getting such a close looking image. :)
Thanks for this! For us mere mortals it’s always nice to get your FX insights.
Awesome stuff! Well worth the wait!
So what you’re saying is: Don’t blame the modelers for Starbucks new shiny Viper.
Sweet! I love the explanation of how this is done. It only adds to the magic!
Excellent article :)
BTW: On the whole ‘picking up girls’ thing…are you using Lightwave for that too?
;-)
Thank you for these posts. I love “how to” stuff in general, and things like this, showing the steps in effects work is especially tasty.
Definitely share your tips on picking up girls when you get that figured out, K? I think that’s one of the most searched topics on the internet. Make sure you have plenty of bandwidth for all the hits you’ll get.
Great write up, thanks for the insight.
What a great post, Moj, thanks! I’m not usually as into the rendering process (much as I drool over the results every week), but this was a really fun process to follow, and a terrific result. Kudos to you and of course to Derek!
A wonderful post, Mojo. I think it’s not only great to share with others the painstaking process involved in CG animation creation, but more importantly, the need to create imperfection. Considering the types who’ll obsess over each and every detail, the necessity of creating defects to increase the sense of realism in the final product is wonderfully ironic.
Oh, and ha! Called it right. :)
And kudos to Derek Smith for a job done well done.
Sneaky, sneaky. You tell us it’s a model-review, but all that was just a ruse to do one of the best CGI lighting how-to’s I’ve ever read. Thanks!
This is very interesting. I note that in one respect the CGI Viper looks more real (i.e., less perfect) than the 1979 Viper: there is more visible dirt, grease, and/or burn marks on the wings. In the original show, as in the current show, these ships are a bit beat-up from constant use. I think the CGI model captures that better than the real model. I also note that the dirt/burn marks are nicely uneven and splotchy, giving it a real-world look.
And now, a rebuttal:
First, thanks for the kind words.
Second, though probably first, thanks to Mojo for taking the time with the mesh. It’s one thing for me to ‘nights and weekends’ this (even with the long breaks away from it) and get used to seeing the flaws and side-stepping them, another to have someone who can really give me something to make good, solid comparisons with, as Mojo’s done here. I can’t turn away from them any longer. Those few ‘benefits of the doubt’ I’d given myself? Gone. I see a good bit to jump on to solidify thanks to this test, and for me it’s done a lot to underscore the need to really dig into lighting and understanding photographic reality.
Cool process, huh?
Now, what was that about picking up girls? Can we get that posted a bit earlier?
The secret revealed at last! Thanks, Mojo. That was very fun and informative. CGI modelers and animators take notes from a master!
Another great breakdown and a lesson to all of us who obsess over the minute details on our models and then just plonk in a few lights without much thought. :)
My real clue as to which was the studio model vs digital model was the cockpit. The CGI model has a cockpit and you can see right through it. The Studio Model does not.
BTW, excellent lesson on how to retro.
It really is all about lighting, isn’t it? Congrats to Derek, who should be proud that a lot of the correct guesses were based on things other than his actual model.
Oh, and the secret to picking up girls? Lift with your legs.
Thanks Mojo! This is exactly the kind of stuff I enjoy here! Never slack on the FX details, please. BTW- have you had an opportunity to sample some of Lightwave Core yet? Just curious- sounds like its gonna rock…
Oh wow, this was very interesting to read!
Wow I can’t wait for next week. What software program do you use to pick up girls. Is it off the self or proprietary?
Cheers, Mojo! Really, the giveaway was that Derek’s viper was too detailed compared to the original. That’s hardly a sin. The walkthrough on lighting was very cool, but if you could go into a smidge more detail about hammering it post, that’d be most welcome.
PS: Kevin: I love doing 3D. I get to say “Nah, can’t come to the pub, lads – I have to work late boning a model…”
Mark: What extra detail are you looking for about the post-process? What I explained in the post is really all there was:
– Add a touch of film grain
– Add a touch of “enlarged” chromatic grain (this gave it a hint of the mpeg compression look
– Added glow to the engines
I may have played with the red channel a tiny bit to make the color of the red stripe a more perfect match, but that’s about all there was.
That being said, the world of post production on CGI FX shots is often overlooked by people just getting involved. Sure, we can spit some pretty nifty stuff out of our 3D software, but final tweaks in the compositing software of your choice can make all the difference (and it can save you from needing to re-render!)
Back in the early days of Babylon Five and even most of Voyager, we rarely did any post-processing. What came out of Lightwave is pretty much what wound up on the air (although on Star Trek, the FX supervisors would take a handfull of elements and do their own tweaks to the shots in the editing bay).
Of course, looking back now, I can’t believe we did that! Today it’s standard practice to break shots out into their component elements and “create” the final shot in comp (hollywood slang for “compositing.”)
Still, I think sometimes people go to far with the number of elements they break shots into… yes, you’ll almost always get better results by building and adjusting a shot in comp, but it does take a fair amout of extra time to spit out all those elements and, of course, to do the actual comp work. A talented artist can get a shot looking VERY close to final by tweaking things within the 3D package.
For something like a simple shot (let’s say an establishing shot of the Galactica,) I daresay you’d end up with maybe a 20% improvement in the look of the final by breaking the shot out into elements and compositing, but at a cost of perhaps double the work and manhours. Is it worth it?
If you’ve got unlimited time and money, sure, go for it. But on a TV schedule, it might be wise to balance things out by examining each shot and deciding – in advance – what elements are truly necessary to seperate out to get you that extra bump in quality.
I’ve watched people break out a ship no larger than a postage stamp into half a dozen seperate elements, simply because it was “standard procedure.” Doing this isn’t going to make an appreciable visual difference to the shot, but it is going to suck up extra time, from the 3D artist creating those elements, to the time it takes to check them, and for the compositor to load and balance them.
Let’s say that amounts to 15 minutes of extra time… no big deal, right? But when you consider that an episode of a TV show can have thousands of individual elements, the 15 minutes saved here and there by customizing a breakout will ultimately save a LOT of time – time that could be spent tweaking where it counts.
And I’m curious (naturally :-))where you see detail that isn’t on the original? Or do you mean that it still shows up after not being lost in the optical mix? There is one area that is differently detailed, but doesn’t really carry an abundance of ‘extra’ detail in it– if I’d stayed true to the model, it may not have held in close-ups, though it would have looked cool all the same.
One thing I’ve always been curious about is the time going in IN ADVANCE to nail a look as early as possible and tie your pipeline to that. You really don’t want ‘Eureka!’ moments after you’re far along (and the show’s on the air, say) and start getting noticeable jumps in quality levels or changes in looks, yeah? So, R&D time?
Thanks for this. I’d love to see a critique of the critiques, though. Which of us fastened onto actual tell-tales, and which were barking up the wrong tree?
Ah way-coolness to have just found your blog dude. Will *most assuredly* being readin’ it all through eh. :)
Thanks much for takin’ the time to share your pics/renders and insights . Very cool of you eh. :D
Live Long and Prosper,
deg
Hey Mojo,
This is really a question, and not meant as a harsh criticism, but did you work on the shot of the President’s ship landing inside of Galactica’s landing bay? That shot, in particular the one where the crew man is walking in front of it, struck me as the most unrealistic feeling / looking CG shot in some time for the series. Is there anything that you feel might have contributed to that / went wrong with the shot that you can tell us about?
One thing I liked about that shot was the return of the landram, which I don’t think had been seen since Racetrack crashed into one in an earlier season 4 ep. And it had a new floodlight attachment, too.
Just dropping by.Btw, you website have great content!
I love getting the behind-the-scenes scoop from your blog. If you don’t mind, I have a general question about Battlestar Galactica. On my blog, Galactica Science, blogger Brad Templeton wrote a comment:
“I suspect they [the CGI production team] don’t get told much. They may just get told, ‘Animate some jump sequences with pretty backgrounds.'”
Personally, I’m thinking the CGI crew got a lot of direction about what to show.
So, how was it really? Was anyone making sure that the CGI guys stuck to science in the CGI sequences?
Like I said on the BSG post, I think BSG TOS should be given the same type of remastering and CGI SFX as the original Star Trek had.
I would definitely buy the series again with and update of the SFX. But with the same respect given ST:TOS. We don’t need New BSG level effects, but updated enough to improve the look of the show…
The CGI shot before the added grain https://darthmojo.files.wordpress.com/2009/02/stage9-engines.jpg is what people expect from Blu-Ray releases. Personally, I rather have the DVD version, even if it is “fuzzier.” Too much “realism” makes it less fun. I don’t want to feel like “I’m there.” That’s why I was so disappointed the Pirates of the Caribbean BD: it bugged the hell out of me that the people were so clear!
For some reason, the CGI model’s wings seem longer and not as angled…
WOW. Im impressed! Show us more pics please… :mrgreen: